
The most expensive part of your artificial lawn isn’t actually the grass; it’s the dirt underneath it. While a lush, green surface is what everyone sees, the real work happens in the layers you’ll never notice once the project is finished. If you’re wondering how to prepare ground for artificial grass, you’ve already identified the single most important factor for success. Skipping the foundation leads to sinking, puddles, and a lawn that looks aged within a single season. We treat ground preparation with the same meticulous care as a driveway sub-base because we know that stability is the only way to guarantee a result that stays beautiful for over a decade.
We understand the worry that comes with investing in your garden. You don’t want to see your beautiful new space become uneven or bogged down by poor drainage after the first heavy rain. This guide will help you master the essential steps of sub-base preparation to ensure your lawn remains flat, well-drained, and pristine for years. We’ll walk you through everything from excavation depths to the specific materials, such as MOT Type 1 and grano dust, that create a rock-solid foundation. By the end, you’ll have the confidence to build a base that supports your evergreen vision for the next 15 years.
Key Takeaways
- Artificial grass acts as a flexible carpet, meaning a perfectly level sub-base is the only way to avoid visible lumps and bumps in your finished lawn.
- Mastering how to prepare ground for artificial grass requires excavating to a precise depth of 75mm to 100mm to ensure all unstable organic material is removed.
- Using industry-standard MOT Type 1 aggregate provides the essential load-bearing foundation needed for superior drainage and long-term stability.
- Proper perimeter edging, whether using timber or concrete haunching, is vital to keep your lawn secure and prevent the edges from creeping or fraying.
- Professional compaction techniques eliminate air pockets, giving you peace of mind that your garden won’t sink or puddle during heavy UK winters.
Why Ground Preparation is the Most Critical Step
Think of your new lawn as a high-performance surface of synthetic fibers. Much like an indoor carpet, this material is incredibly flexible and will eventually mirror every single imperfection in the earth below it. If there’s a stray stone, a protruding root, or a soft patch of soil, it will eventually appear as a lump or a dip on your pristine green surface. Mastering how to prepare ground for artificial grass isn’t just a preliminary chore; it’s the defining factor in whether your lawn looks professional or amateur after six months.
Beyond the aesthetics, the foundation serves as your garden’s primary drainage system. During a typical UK winter, your lawn needs to handle significant rainfall without turning into a swamp. A correctly installed sub-base acts as a massive soakaway, pulling water through the permeable backing of the grass and dispersing it into the ground. Without this structural layer, you’ll face “puddling” issues where water sits stagnant on the surface, potentially damaging the grass fibers and making the area unusable for weeks at a time.
The Consequences of Poor Ground Preparation
Cutting corners during the initial dig-out leads to visible “tracking” and “dipping” in high-traffic areas. If you are researching how to prepare ground for artificial grass, understanding the risks of skipping the compaction stage is vital. If you frequently walk the same path to a garden shed or play area, a weak base will eventually compress, leaving permanent grooves in your lawn. Poorly prepared ground also creates hygiene risks. If moisture or pet waste becomes trapped in a non-porous base, it can lead to unpleasant lingering odours that are difficult to flush out. Many homeowners also worry about the “weed invasion” myth. While most weeds grow from wind-blown seeds landing on top of the grass, a lack of a professional weed membrane allows deep-rooted perennial weeds to push up from the soil, potentially piercing the backing of your new turf.
The McCready Standard: Driveway-Grade Foundations
We approach garden landscaping with the same technical rigour we apply to our tarmacadam and block paving driveways. We don’t believe in “quick fixes” that look good for a single summer. Instead, we build a 15-year foundation designed to withstand heavy use and changing weather patterns. By using driveway-grade compaction and high-quality aggregates, we ensure your investment remains a permanent asset to your property. For homeowners in Hinckley and Nuneaton, this level of meticulous care doesn’t just provide peace of mind; it adds genuine value to your home by ensuring your outdoor space stays polished and maintenance-free for the long haul.
Step 1: Excavation and Clearing the Site
The first physical step in your garden transformation is often the most demanding. When you’re learning how to prepare ground for artificial grass, you’ll quickly realize that removing the old turf is only the beginning. You aren’t just clearing the surface; you’re creating a void that will hold the structural integrity of your new lawn. For a professional result, we recommend excavating to a depth of 75mm to 100mm. While budget guides might suggest a shallower dig, they don’t account for the long-term stability required to prevent the surface from shifting over time.
Managing the waste is a logistical challenge many homeowners overlook. Excavating a standard 40-square-metre garden to a depth of 100mm produces roughly six to eight tonnes of soil and turf. This usually requires a large skip and a significant amount of manual labour. If your property has limited access, planning the waste removal is just as important as the dig itself. If the scale of the excavation feels overwhelming, our team provides a full artificial grass installation service that handles everything from the first shovel to the final sweep.
Identifying Your Soil Type
Before you dig too deep, perform a simple “Squeeze Test” to understand what’s beneath your feet. Take a handful of damp soil and squeeze it firmly in your palm. If it crumbles easily, you have sandy or loamy soil. If it holds its shape and feels sticky, you’re dealing with the heavy “Midlands Clay” common in Hinckley and Nuneaton. Clay soil is notorious for holding water and shifting during seasonal temperature changes. Because of this, clay requires a deeper excavation and a thicker layer of MOT Type 1 aggregate to provide a stable foundation. We also look for drainage “hotspots” during this stage, identifying areas where water naturally pools so we can address them before the sub-base goes in.
Removing Organics and Roots
Your goal is to reach the stable sub-soil layer beneath the organic topsoil. You must remove every trace of grass, weeds, and large roots. Some DIYers try a “spray and lay” method where they kill the grass with chemicals and lay the base directly on top. We never recommend this. As the dead organic matter rots down, it creates air pockets and soft spots. This is exactly how the “sinking lawn” syndrome begins. While general advice on how to install artificial turf covers the basics, local expertise ensures you protect your garden’s existing features. We take extra care around tree roots and patio edges to ensure the excavation doesn’t undermine the stability of your existing garden walls or paving.
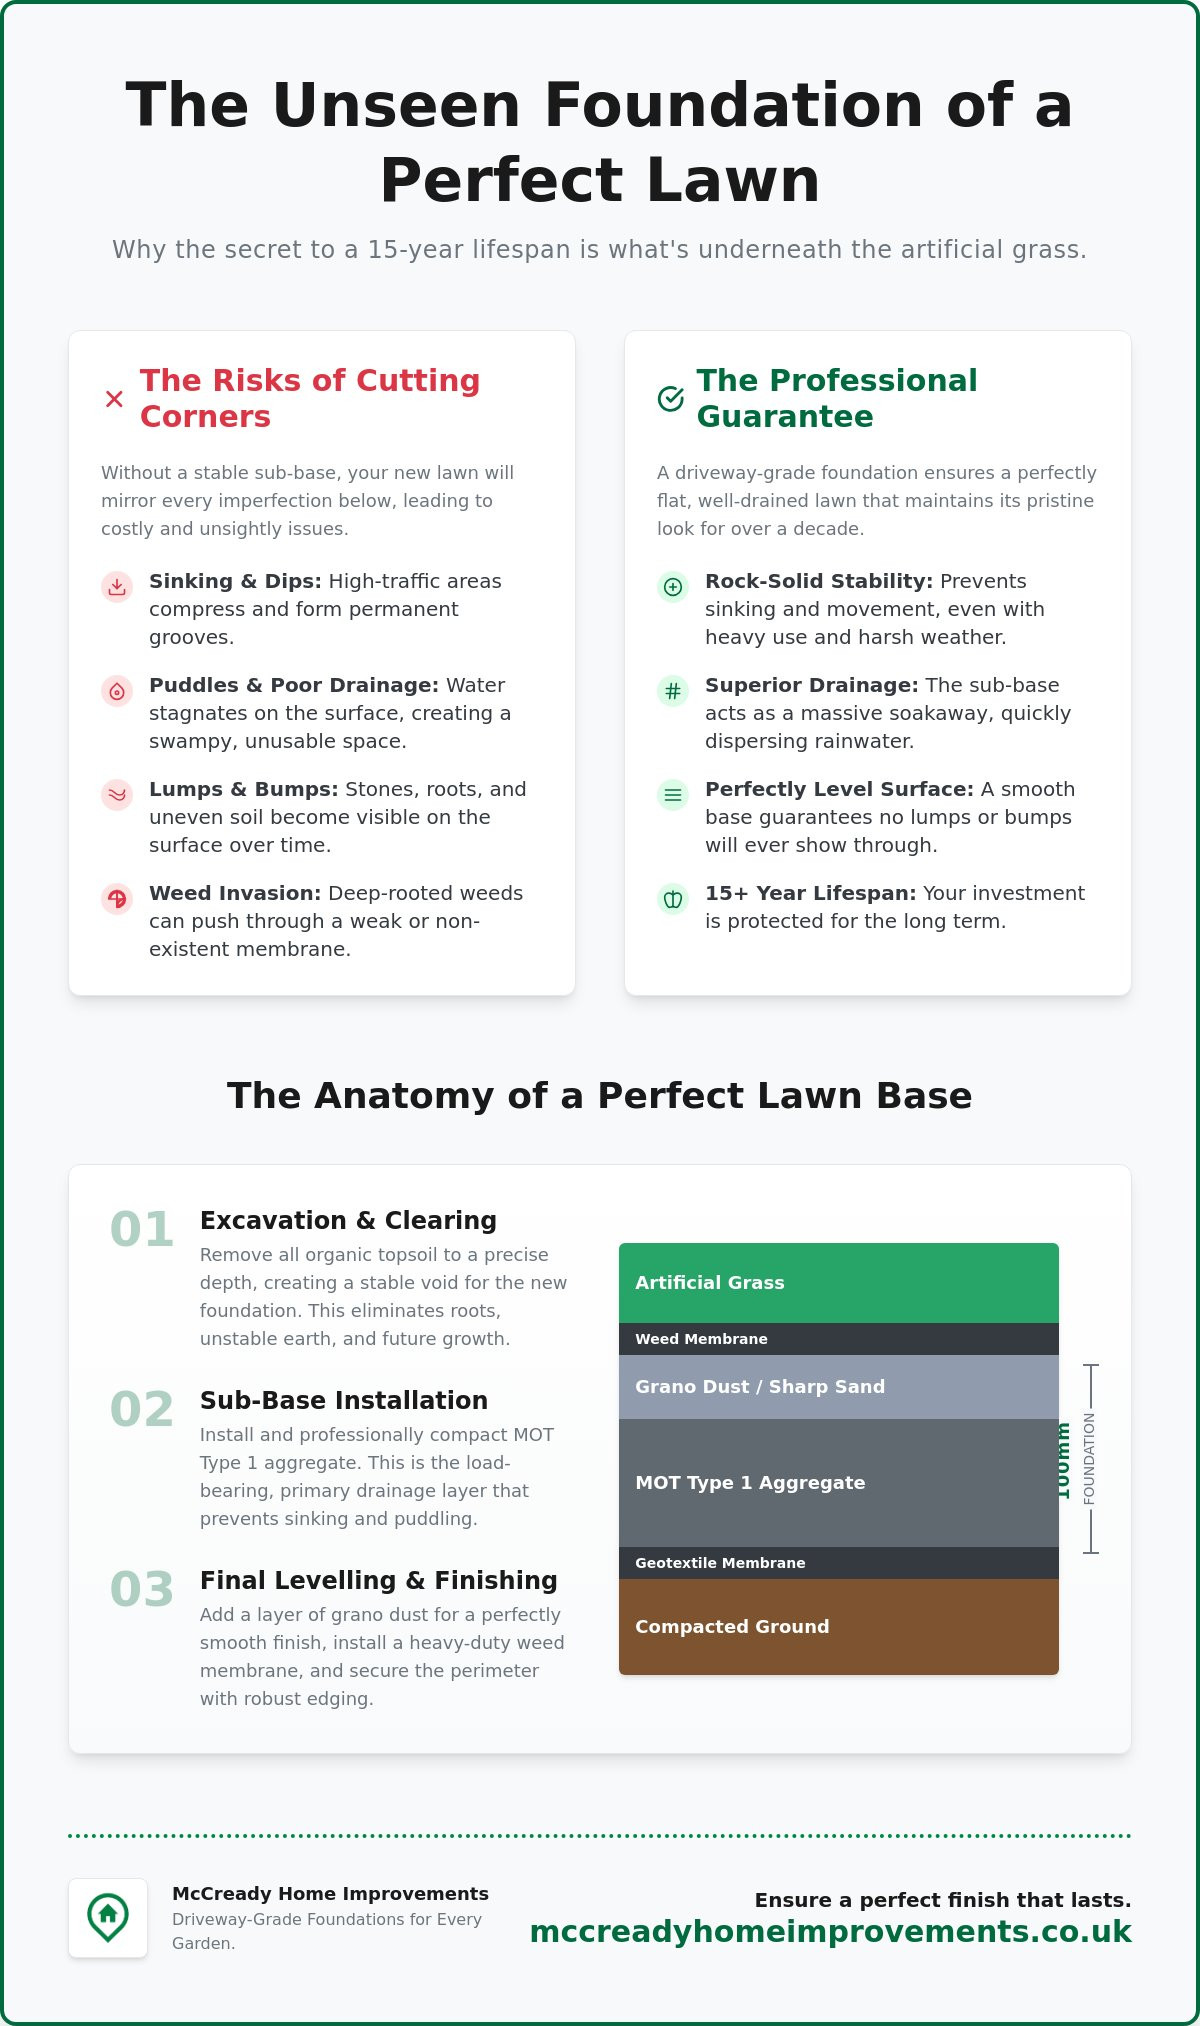
Step 2: Installing the Sub-Base and Achieving Compaction
Once you have cleared the site and reached the stable sub-soil, the focus shifts to building a foundation that won’t budge. If you want to know how to prepare ground for artificial grass so it lasts 15 years, you must view this stage as a structural engineering task. We begin by laying a substantial layer of MOT Type 1 aggregate. This crushed stone provides the load-bearing strength your lawn needs to support garden furniture, foot traffic, and even the occasional heavy play set. Without this “skeleton,” your lawn is essentially sitting on a soft sponge that will eventually deform.
After the stone layer is level, we apply a final 20mm to 25mm layer of grit sand or sharp sand. This finer material acts as a screed, filling the small voids in the MOT Type 1 and providing a smooth, workable surface for the grass to sit on. During this process, we always incorporate a subtle “camber” or fall. By creating a gradient of roughly 1:100 away from your house or garden walls, you ensure that heavy rainfall is directed toward natural drainage points rather than pooling against your property’s foundations.
MOT Type 1 vs. Simple Sand: The Stability Debate
Many budget-conscious DIY guides suggest using only a thick layer of sand to level the ground. This is a recipe for disaster. Sand is a fluid material; it shifts under pressure and is easily displaced by heavy rain or persistent foot traffic. If you use only sand, you will eventually see “footprints” and depressions where people walk most often. MOT Type 1 is a specific grade of crushed aggregate that meets the Department of Transport standards for creating a stable, load-bearing, and permeable sub-base. By using this crushed granite or limestone, you create a locked-in foundation that remains porous while providing the rigidity of a driveway.
The Art of Mechanical Compaction
Hand-tamping with a manual tool is simply insufficient for a professional-grade artificial lawn. It might feel firm to the touch, but it won’t eliminate the deep-seated air pockets that lead to future sinking. We always use a heavy-duty vibrating plate compactor, commonly known as a wacker plate, to achieve maximum density. We follow a strict “two-pass” rule: we compact the MOT Type 1 layer thoroughly before adding the sand, and then we compact the sand layer again. This ensures every millimetre of the base is solid. Before the final grass is laid, we walk the entire area to check for “soft spots.” If we find any movement, we add more material and compact again until the ground feels as solid as a pavement. This meticulous approach is what separates a professional installation from a weekend project that might fail by next spring.
Step 3: Edging, Weed Membranes, and Final Levelling
Once the heavy lifting of compaction is complete, you’re ready for the precision work. A common mistake when learning how to prepare ground for artificial grass is treating the perimeter as an afterthought. Without a secure edge, the grass backing will eventually fray, and the sub-base materials can migrate, causing the edges to “creep” away from your patio or flowerbeds. We view the edging as the frame for your garden’s new masterpiece. It provides the necessary tension to keep the turf taut and prevents the base from washing away during heavy downpours.
The final step before the grass goes down is the screeding. We use a straight edge to smooth the grit sand layer, ensuring it’s perfectly flat and flush with your chosen edging. This is where meticulous care pays off. Any small dip or protrusion left at this stage will be visible through the grass forever. If you want a result that looks like a professional showroom, our team can handle the professional artificial grass installation for you, ensuring every edge and membrane is perfectly placed.
Choosing the Right Edging for Your Garden Style
The material you choose should reflect both your budget and the existing architecture of your property. Treated timber battens are a popular choice for their cost-effectiveness and ease of installation, especially for gardens with long, straight lines. If your project sits alongside existing block paved driveways, we often recommend concrete haunching or decorative brick edging to create a cohesive, high-end look. For those who prefer a seamless “grass-to-flowerbed” transition, hidden steel edging is an excellent choice. It disappears once the grass is brushed up, giving you a clean, contemporary finish that’s incredibly durable.
Membrane Placement: Above or Below the Base?
One of the most debated topics in how to prepare ground for artificial grass is where to place the weed membrane. Many guides suggest placing it directly under the grass, but we prefer a more robust approach. We install a heavy-duty geotextile membrane beneath the MOT Type 1 sub-base. This serves a dual purpose: it separates the stone from the soil to prevent the base from sinking into the earth over time, and it provides a primary barrier against deep-rooted weeds. We use only breathable membranes to ensure the soil beneath remains healthy and water can drain freely. For gardens with high weed pressure, you can add a second, lighter layer directly under the grass, but the structural layer at the bottom is what provides long-term stability.
The Professional Edge: Why Local Expertise Matters
Understanding the theory of how to prepare ground for artificial grass is one thing; executing it with eight tonnes of aggregate and a heavy-duty vibrating plate compactor is another. A DIY weekend project often turns into a multi-week struggle that leaves you with a sore back and a lawn that might still sink in two years. We bring industrial-grade equipment and years of groundwork experience to every garden we touch. Our team ensures the excavation is precise and the compaction is absolute. This professional approach removes the guesswork and the physical burden from your shoulders, giving you a result that stays level for a decade or more.
In Hinckley and Nuneaton, we’ve built our reputation on doing the job right the first time. We treat your property with the same respect we would give our own homes. Because we are local experts, we understand the specific challenges of Midlands clay and how it reacts to our local weather patterns. We don’t just lay grass; we build a foundation that supports your lifestyle. Whether your children are playing football or you’re hosting a summer barbecue, our expertly prepared base stays flat, stable, and perfectly drained.
Comprehensive Landscaping Solutions
We often frame an artificial lawn as just one piece of a larger property evolution. Many of our clients choose to pair their new evergreen surface with high-quality fencing and gates to create a fully secure and private sanctuary. We can even integrate a stunning resin bound patio to provide a contrasting texture that perfectly complements the lush green turf. This total solution approach ensures every element of your garden works in harmony. If you’re ready to transform your outdoor space, we provide free, no-obligation estimates for homeowners across the region. Our goal is to provide a seamless transition from your initial vision to a finished, polished result.
Long-Term Maintenance and Aftercare
A professionally installed lawn is remarkably low-maintenance, but it isn’t “no-maintenance.” You’ll still need to remove leaves and debris to prevent organic matter from breaking down in the fibers. Brushing the pile occasionally with a stiff broom keeps the blades upright and looking natural. Because our how to prepare ground for artificial grass process is so thorough, you won’t have to worry about deep-rooted weeds pushing through from below or dips forming over time. This solid foundation makes your ongoing care simple and effective. If you have questions about your specific project or want to book a professional installation, contact McCready Home Improvements today to speak with a dedicated local expert.
Transform Your Garden with a Lasting Foundation
A beautiful, maintenance-free lawn is within your reach, but it requires more than just high-quality turf. We’ve explored why deep excavation, the use of MOT Type 1 aggregate, and robust mechanical compaction are non-negotiable for a professional finish. Mastering how to prepare ground for artificial grass ensures your garden remains a functional, flat, and free-draining space that adds genuine value to your home. By treating the sub-base with the same care as a driveway foundation, you prevent the common pitfalls of sinking and poor drainage that often plague DIY projects.
Our expert local team serves homeowners across Hinckley and Nuneaton, providing everything from high-durability groundwork to comprehensive landscaping, including new fencing and patio installations. We take pride in delivering meticulous craftsmanship that stands the test of time. Get your free, no-obligation artificial grass installation estimate from McCready Home Improvements today and take the first step toward a pristine garden you can enjoy all year round. Your dream lawn is just a solid foundation away.
Frequently Asked Questions
Do I need to remove the existing grass before installing artificial turf?
Yes, you must remove every trace of existing turf to reach the stable sub-soil beneath. Leaving organic matter like grass or roots causes it to decompose over time, which creates air pockets and soft spots. Stripping the grass back ensures you have a clean, solid slate for the structural layers that keep your lawn flat and beautiful for years.
How deep should I dig out for an artificial grass sub-base?
You should typically dig to a depth of 75mm to 100mm to achieve a professional result. This specific depth provides enough room for a substantial layer of MOT Type 1 aggregate and a final sand screed layer. Learning how to prepare ground for artificial grass correctly involves ensuring this void is deep enough to support the heavy materials that prevent sinking or shifting.
What is the best material to put under artificial grass?
The best material combination is a base of MOT Type 1 crushed stone followed by a finishing layer of grit or sharp sand. MOT Type 1 provides the essential load-bearing strength, while the sand creates a smooth, level surface for the grass backing to sit on. This pairing ensures your lawn remains stable under foot traffic while maintaining excellent permeability for drainage.
Can I lay artificial grass directly on top of soil or dirt?
No, laying artificial turf directly on soil or dirt is a significant mistake that leads to rapid failure. Soil is naturally unstable and will shift under foot traffic or during heavy rainfall, causing your lawn to become lumpy and uneven. A dedicated sub-base of stone and sand is required to prevent sinking and to ensure your garden doesn’t turn into a mud pit.
How do I ensure my artificial grass drains properly during heavy rain?
You ensure proper drainage by using a permeable sub-base and incorporating a slight fall across the lawn. We recommend a gradient of roughly 1:100 to direct surface water toward natural drainage points or away from your home’s foundations. The MOT Type 1 layer acts as a large soakaway, allowing rain to pass through the grass backing and into the ground.
Is a weed membrane really necessary for artificial lawns?
Yes, a heavy-duty geotextile weed membrane is absolutely necessary for a long-lasting installation. It serves as a vital separation layer that prevents your expensive sub-base stone from sinking into the soft soil over time. It also provides a primary barrier against deep-rooted perennial weeds that might otherwise try to push through the drainage holes in the grass backing and damage the turf.
How do I stop the edges of my artificial grass from lifting?
You stop the edges from lifting by installing a secure perimeter edging system before laying the grass. Options like treated timber battens, concrete haunching, or metal edging provide a solid anchor point for the turf. These edges allow you to firmly tack or glue the grass in place, preventing it from creeping, fraying, or being tripped over during daily garden use.
Can I install artificial grass myself or should I hire a professional in Hinckley?
While DIY is possible for very small areas, hiring a professional in Hinckley ensures your garden investment lasts for 15 years or more. Professional installers possess the heavy-duty compaction equipment and local experience needed for how to prepare ground for artificial grass in challenging Midlands clay soil. We treat every garden project with meticulous care, providing you with a perfectly flat finish and total peace of mind.
