
The high-pressure blast you think is cleaning your driveway might actually be the very thing shortening its lifespan. It’s a common concern for homeowners who have invested in a sleek, permeable surface. You want to maintain that pristine kerb appeal, but the fear of accidental cracking or stubborn moss in shaded spots can make even basic upkeep feel like a gamble. We believe that caring for your home should bring peace of mind, not extra stress. We understand that your property is your pride and joy, and maintaining its value requires the right approach.
This resin driveway maintenance guide provides the professional techniques and simple habits you need to protect your investment for decades. You’ll learn how to preserve the vital chemical bond of your surface while keeping it looking brand new. We’ll walk you through a clear, actionable cleaning routine, identify which household products are safe for your stone, and explain how to manage seasonal challenges like winter frost and summer UV exposure. By the end of this guide, you’ll have the confidence to handle any stain or weather impact with the precision of a local expert, ensuring your home’s exterior remains a standout feature of the neighborhood.
Key Takeaways
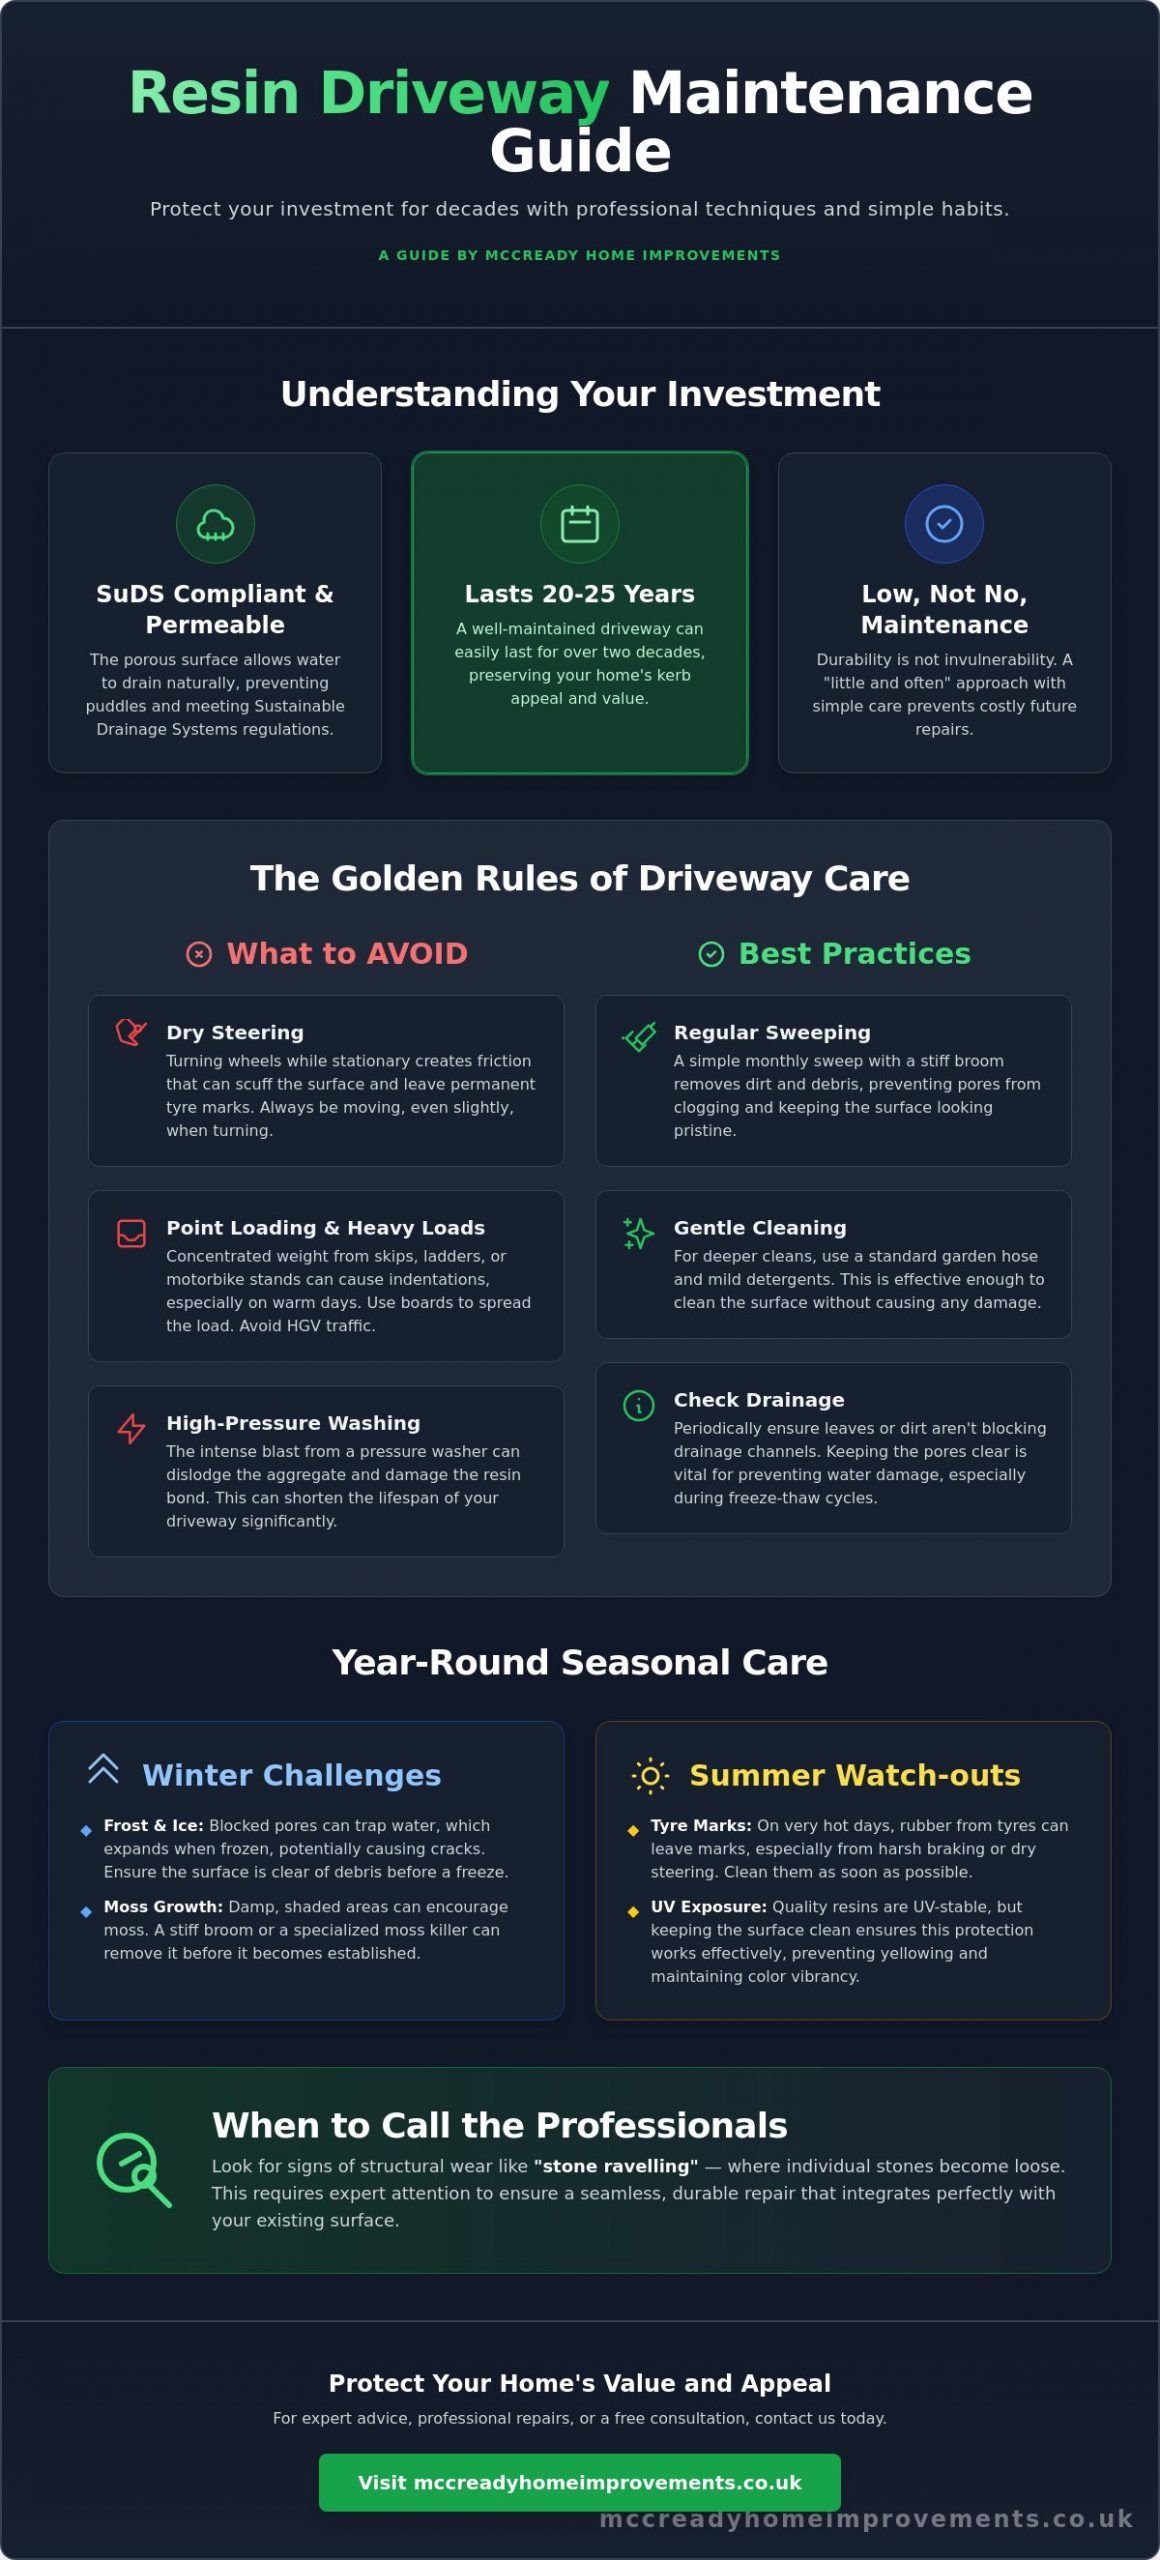
- Maintain your property’s SuDS compliance and modern aesthetic by mastering the professional habits that preserve a UV-stable finish.
- Prevent permanent surface damage by following the “Golden Rules” of mechanical care, including the critical avoidance of dry steering.
- Follow this resin driveway maintenance guide to establish a reliable cleaning programme using a stiff broom and mild detergents.
- Manage seasonal impacts with confidence, from clearing winter moss growth to protecting your driveway against summer tyre marks.
- Recognize the specific signs of structural wear, such as stone ravelling, which require expert attention to ensure repairs remain seamless and durable.
Understanding Resin-Bound Maintenance: Low vs. No Maintenance
A resin-bound driveway is more than just a decorative surface. It’s a high-performance system where natural aggregates are fully coated in a clear polyurethane resin. This process creates a smooth, durable, and porous finish. Unlike older methods, Resin-bound paving allows water to filter through the surface naturally. This keeps your home compliant with Sustainable Drainage Systems (SuDS) regulations. While it’s often marketed as a “fit and forget” solution, the reality is that low maintenance doesn’t mean no maintenance. We’ve seen many homeowners mistake the durability of the surface for invulnerability. This resin driveway maintenance guide helps you understand that a small amount of care prevents major issues down the road.
Traditional surfaces like Tarmacadam or Block Paving have different needs. Tarmac can soften in high heat, and block paving often suffers from shifting sand and weed growth in the joints. Resin avoids these specific problems, but it requires a different kind of vigilance. The first 12 months are particularly vital. Even though the driveway is ready for use within days, the resin continues its final curing phase during this first year. Treating the surface with extra care during this period ensures the chemical bond remains intact for the long haul.
The Science of a Long-Lasting Surface
The longevity of your driveway depends on its ability to breathe. Dirt, silt, and organic matter can eventually clog the permeable pores. If water can’t drain, it sits on the surface or gets trapped. This can lead to sub-base movement or surface cracking during a freeze. UV stability is another critical factor. We use high-quality resins that resist the sun’s rays. Without this protection, surfaces can turn yellow or become brittle. Keeping the surface clean ensures these UV-resistant properties do their job, maintaining the vibrant colour of your chosen aggregate and protecting the structural bond.
Setting Realistic Expectations for Homeowners
A well-maintained resin-bound driveway can easily last 20 to 25 years. We want you to enjoy that full lifespan without the need for costly repairs. Achieving this doesn’t require back-breaking work; it just needs a “little and often” approach. Most manufacturer guarantees require a basic level of care to remain valid. Instead of waiting for a year and using aggressive industrial cleaners, a simple monthly sweep makes a world of difference. It’s about preserving the polished look of your property while protecting the structural integrity of the installation. We treat every project with the respect of a personal residence, and we want your results to stay as impressive as the day we finished.
The Golden Rules: Preventing Mechanical and Chemical Damage
Protecting your property requires a proactive approach. You’ve invested in a premium finish, so it’s vital to shield it from avoidable harm. We categorise these threats into mechanical damage and chemical damage. Mechanical issues arise from physical stress and friction, while chemical damage involves substances that eat away at the resin bond. Following the core principles of this resin driveway maintenance guide will keep your surface looking sharp and structurally sound for years to come. We treat every driveway with the respect of a personal residence, and these rules reflect that high standard of care.
Dry steering is the most common cause of preventable surface scuffing. This happens when you turn your steering wheel while the vehicle is completely stationary. The action generates significant frictional heat between the tyre and the aggregate, which can grind the stones or leave stubborn black rubber marks. It’s a simple habit to break; just make sure your car is moving slightly before you begin to turn. This small adjustment preserves the smooth, polished texture we worked so hard to achieve during the installation process.
Managing Heavy Loads and Stationary Vehicles
Point loading is a physical risk that many homeowners overlook. This occurs when a heavy weight is concentrated on a very small area, such as a motorbike kickstand, a heavy ladder, or the metal feet of a skip. On a warm day, these concentrated loads can indent the surface. If you’re having maintenance work done on your home, always place load-spreading boards under skip feet or any heavy machinery. We also recommend keeping HGVs off residential-grade resin. Most domestic driveways aren’t designed for the weight of multi-axle lorries. If you need a surface built for heavier traffic or commercial use, exploring our Tarmacadam Driveways might be the right move for your next project.
Chemical Safety and Spill Response
Your resin binder is tough, but it’s not invincible against harsh household chemicals. Spills from petrol, diesel, or engine oil are the most frequent culprits. These fluids act as solvents, softening the resin binder and eventually causing the stones to come loose. We recommend a strict 30-minute rule: if you spot a spill, flush it immediately with plenty of warm, soapy water. Don’t let it sit and soak into the pores. You should also avoid using harsh acids or undiluted bleach for general cleaning. These substances can discolour the aggregate and weaken the chemical bond. Stick to mild detergents and a standard garden hose to keep the surface safe and clean without risking the integrity of the finish.
The Step-by-Step Resin Cleaning Programme
Consistency is your best tool for preserving a flawless finish. You don’t need a commercial-grade arsenal to keep your property looking its best; you just need a reliable routine. A professional resin driveway maintenance guide focuses on simple, repeatable habits that prevent the buildup of organic matter. We recommend a two-tier approach. Perform a quick sweep once a month to remove loose debris, and schedule a more thorough deep clean every six months, typically in the spring and autumn. This prevents leaves and silt from breaking down and clogging the permeable pores of your surface.
Your basic cleaning kit is likely already in your garden shed. You’ll need a stiff-bristled broom, a standard garden hose, and a mild detergent, such as liquid dish soap. We suggest the “Flush and Brush” method for routine care. Start by wetting the surface with your hose to loosen fine dust. Apply your soapy solution and use the broom to gently agitate any trapped silt. Finish with a thorough rinse until the water runs clear. This process keeps the drainage system functioning perfectly and maintains the vibrant aggregate colour that gives your home its kerb appeal.
Mistreating a power washer is the fastest way to void your guarantee and damage the resin bond. High-pressure jets can strip the resin from the stones or create permanent “wand marks” across the surface. While we generally prefer a garden hose, you can use a pressure washer if you follow strict safety protocols. Never use a pencil jet or a rotating dirt-blaster nozzle, as these are far too aggressive for resin-bound systems.
Safe Pressure Washing Techniques
If you choose to use a power washer, keep the pressure below 150 bar (approximately 2100 PSI). Use a wide fan spray pattern to distribute the force evenly across the aggregate. You must keep the nozzle at least 20cm away from the surface at all times. Moving the wand in a steady, sweeping motion prevents the pressure from concentrating on a single spot. This careful approach removes stubborn grime without risking the structural integrity of the polyurethane bond.
Removing Stubborn Stains: Oil, Rust, and Chewing Gum
Accidents happen, but they don’t have to be permanent. If you spot an oil or petrol spill, act quickly with a mild degreaser designed for sensitive surfaces. For chewing gum, don’t try to scrape it off while it’s soft. Instead, use a freezing spray or an ice pack to harden the gum, then carefully “pop” it off with a blunt tool. Light rust marks from metal garden furniture or gate hinges can often be treated with lemon juice or a mild citric acid solution. Apply the liquid, let it sit for a few minutes, and rinse thoroughly to restore the pristine look of your driveway.
Seasonal Care: Protecting Your Driveway Year-Round
Your property faces different environmental pressures as the seasons change. A truly effective resin driveway maintenance guide isn’t just about cleaning; it’s about anticipating these shifts to prevent long-term wear. We’ve seen how the UK weather can impact even the highest-quality installations. By following a simple 12-month checklist, you ensure your surface remains as resilient as it is beautiful. We treat every project as a partnership with the homeowner, and helping you manage these seasonal cycles is part of that commitment.
Spring is the season of recovery. Once the frost clears in March, perform a thorough inspection of the aggregate. Look for any early weed growth that might have taken root in surface-level dust or silt. While weeds cannot grow through the resin itself, seeds can germinate in trapped debris. Summer brings the challenge of high temperatures. On days when the mercury rises above 25°C, your driveway can absorb significant heat. We recommend hosing the surface down during heatwaves to keep the resin hydrated and cool. This helps prevent “hot tyre” marks, which occur when warm rubber interacts with a heated surface.
Autumn requires the most vigilance regarding organic debris. Falling leaves are more than just a tidy-up job; they contain tannins that can leach out when wet. If left to rot, these tannins can leave stubborn brown “shadow” stains on your light-coloured stone. Use a leaf blower or a stiff broom at least once a week during October and November to keep the surface clear. This proactive step saves you from intensive deep cleaning later in the year.
Winter Protection: Salt, Grit, and Snow
Ice removal requires the right materials to avoid surface abrasion. You can safely use white de-icing salt on your resin-bound surface to keep it slip-resistant. However, you should avoid using brown rock salt or grit. These materials contain small stones and silt that can get ground into the pores, acting like sandpaper under car tyres. When snow falls, never use a metal shovel. The sharp edges can scratch the resin bond or even chip the aggregate. Always use a plastic snow shovel and clear the area with a gentle lifting motion. A thorough “spring wash” in March is essential to flush away any salt residue left over from the winter months.
Tackling Moss and Algae in the Midlands
Shaded areas in Hinckley gardens are particularly prone to green algae and moss growth due to the local damp climate. These organic growths don’t just look untidy; they can become slippery when wet. If you notice green patches forming, use a specialist moss killer that is specifically labelled as “resin-safe” and non-acidic. This same care should be extended to your garden areas, as a resin bound patio faces similar shaded conditions. If you’re concerned about the condition of your exterior surfaces or want to upgrade your home’s kerb appeal, we’re here to help. Explore our full range of Patio Design and Installation services to see how we can transform your outdoor space.
When to Call the Professionals: Repairs and Re-Sealing
Even with the most diligent care, certain situations demand the precision of a local specialist. While this resin driveway maintenance guide empowers you to handle routine cleaning, structural issues require professional intervention to avoid permanent aesthetic damage. We take great pride in our meticulous approach to property care, treating every home in Hinckley with the same respect we’d show our own. Attempting complex repairs without the right equipment often leads to unsightly “scars” where the new aggregate fails to match the weathered original surface. Our team ensures that any necessary work blends seamlessly with your existing installation, preserving the polished look of your property.
Professional re-sealing is a vital part of long-term care that most homeowners overlook. We recommend a professional re-seal every 5 to 7 years to restore the surface’s grip and enhance its UV resistance. This process involves applying a high-quality polyurethane topcoat that rejuvenates the binder and protects the stones from becoming brittle. It’s a proactive step that keeps your driveway looking brand new while reinforcing the chemical bond that holds the entire system together. We position ourselves as your long-term partner in home improvement, ensuring your exterior surfaces remain a standout feature for decades.
Identifying Surface Ravelling and Cracks
You must be able to distinguish between minor scuffs and structural failure. Surface-level scuffs are often just rubber deposits, but “ravelling” occurs when individual stones begin to break away from the resin bed, leaving small pits. This is usually a sign that the binder has been compromised. Similarly, while resin is flexible, significant sub-base movement caused by heavy vehicles can lead to deep cracks. If you spot these signs, you should act immediately to prevent water ingress. Water getting under the resin layer can cause the surface to lift during a freeze, leading to much larger, more expensive problems.
The ROI of Professional Maintenance
Investing in professional maintenance offers a significant return on investment by extending the life of your driveway. A timely maintenance visit to patch minor ravelling or re-seal a fading surface can prevent the need for a total replacement, which often costs ten times more than a specialist repair. Beyond the financial savings, a professional inspection provides the peace of mind that your home’s kerb appeal is being protected by experts who value reputation and quality. We’re here to help you manage the evolution of your property with reliable, high-standard workmanship. Contact McCready Home Improvements for a free estimate and let us help you preserve your surface for years to come.
Secure the Future of Your Property’s Kerb Appeal
Maintaining a flawless exterior is about consistent, small victories rather than occasional major overhauls. By mastering the cleaning routines and protection strategies outlined in this resin driveway maintenance guide, you’re doing more than just washing away dirt. You’re actively extending the life of a high-performance, SuDS-compliant system that defines your home’s first impression. Whether it’s the 30-minute rule for spills or the seasonal removal of autumn leaves, these habits ensure your investment remains as striking as the day it was installed. We believe every homeowner deserves the peace of mind that comes with a durable, beautiful entrance.
Our expert local team serves homeowners across Hinckley and Nuneaton, specialising in meticulous resin installations built to last for decades. We treat every project with the respect of a personal residence, focusing on high-level skill and reliable results. If you’re planning a new project or need a professional partner to transform your property’s exterior, we’re ready to provide the expertise you need. Get a free, no-obligation estimate for your driveway project today. Taking pride in your home starts with a surface you can depend on for years to come.
Frequently Asked Questions
Can I use a jet washer on my resin driveway?
You can use a jet washer on your resin driveway, provided you follow strict safety protocols to protect the surface bond. Keep the pressure below 150 bar and maintain a distance of at least 20cm between the nozzle and the aggregate. Always use a wide fan spray rather than a concentrated jet pencil. This prevents the high-pressure water from stripping the resin binder or creating permanent wand marks across your stones.
How do I remove moss and weeds from resin-bound stone?
Remove moss and weeds by using a stiff-bristled broom and a resin-safe, non-acidic moss killer. Weeds don’t grow through the resin itself, but seeds can germinate in trapped silt and dust on the surface. Regular monthly sweeping prevents this organic buildup. For established moss in shaded areas, apply a specialist treatment to kill the roots without damaging the chemical integrity of the polyurethane bond.
Is it safe to use rock salt or grit on resin in the winter?
White de-icing salt is safe to use on resin-bound surfaces, but you should avoid brown rock salt and grit. Grit contains small stones and silt that act as an abrasive under car tyres, which can scratch the polished resin finish. Stick to pure white salt for ice management during the colder months. We recommend a thorough wash in March to remove any lingering salt residue and keep the pores clear.
What should I do if I spill oil or petrol on my driveway?
Flush oil or petrol spills immediately with warm, soapy water to prevent the resin from softening. These fluids act as solvents and can compromise the structural bond of the stones if they’re left to soak into the surface. Follow a strict 30-minute rule for the best results. If a stain persists, use a mild degreaser specifically designed for sensitive stone surfaces to lift the residue without causing discolouration.
Why is my resin driveway turning yellow or fading?
Yellowing or fading is usually the result of using a non-UV stable resin during the initial installation. High-quality installations use UV-resistant binders to maintain the natural, vibrant colour of the chosen aggregate. If your surface is showing signs of discolouration, a professional re-seal can help rejuvenate the appearance. This resin driveway maintenance guide highlights that using the correct materials from the start is the only way to prevent this aesthetic decline.
Can I park a heavy van or skip on a resin-bound surface?
Avoid parking heavy skips or multi-axle commercial vehicles directly on a residential resin-bound surface. If you must have a skip, always place load-spreading boards underneath the feet to prevent indentations or “point loading” damage. While standard domestic vans are generally fine, stationary steering should still be avoided. For properties requiring heavy-duty access, we often suggest our Tarmacadam Driveways as a more robust and practical alternative.
How often should a resin driveway be professionally cleaned?
We recommend a professional deep clean every 12 to 18 months to ensure the permeable pores remain clear of silt and debris. This schedule preserves the SuDS compliance and drainage efficiency of your driveway. For long-term protection, a professional re-seal should be carried out every 5 to 7 years. This routine care prevents the aggregate from becoming brittle and keeps the surface looking brand new for its full 25-year lifespan.
Can cracks in a resin driveway be repaired invisibly?
Invisible repairs are difficult to achieve with DIY kits, but a professional can blend patches effectively to minimize their appearance. Cracks often result from sub-base movement or excessive weight stress. A specialist will cut out the damaged section and replace it with a matching aggregate and resin mix. While a slight colour difference may be visible initially due to weathering, professional techniques ensure the repair is structurally sound and far more discreet than a standard patch.
